

In a previous blog I told about my new 3D printer, and showed a few photos of it printing objects that I had found online. What else can you do with a 3D printer? You can design your own items to print, and those can be anything you can imagine. They might be purely decorative, or could be functional. Here’s something simple that is functional.
Julie has a basket that stands on four metal legs. Unfortunately, the little plastic feet that went on the legs have long since disappeared, and now they scratch the floor.

Simple solution: make some protective feet.
Fortunately, this really is a simple solution. I have some filament that I can print called TPU (thermoplastic polyeruthane) which is flexible but also tough. It sounds like the perfect material for this.
I measured the leg, and it was just a little under 19mm across. So I needed to design a foot that would fit over this 19mm square leg, hold up to some use, and stay on the leg. I decided to make it 2mm thick, as that seemed like a good thickness to not be too flimsy, yet not be overkill.
I use Fusion 360 from AutoDesk for most of my 3D designing. It’s free for hobbyists, and very capable. There are many other 3D design programs that would have worked, but that’s the one I’m most proficient with at this time. Maybe I’ll switch in the future. There is a great open source 3D design program I’m interested in playing with, but for this project I used Fusion 360
How would you go about designing a foot for this? It seems like a simple object, and it is. Just a cube with a hole in it. Like this:
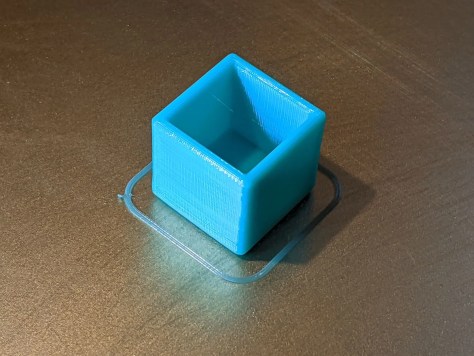
I won’t go into any great detail about designing this, but will give some basic steps.
- The leg is 19mm square, and I want the walls to be 2mm thick. 19mm + 2mm on each side makes 23mm. Draw a 23mm square.
- Extrude that up 23mm, making a 23mm cube.
- On the top surface of that cube, draw a centered 19mm square, leaving 2mm of the original cube on each side.
- Extrude that down 19mm, subtracting this 19mm cube from the 23mm cube. That gives us the basic shape shown above. Note that by doing this we are left with a 4mm bottom. I could have reduced the height of the 23mm cube so that the sides and bottom were uniformly 2mm, but I figured a little extra material on the bottom would just add to the wear resistance.
- Export this object as a 3D mesh, slice it, print it, and test it. I found that it fit, but was a bit loose, and probably would fall off over time.
- Go back to Fusion 360 and tweak the internal (subtracted) cube to 18.5mm. If you’re paying attention (you were, weren’t you?), you’ll notice that the walls are now 2.25mm thick. I didn’t see any reason to go back and adjust this, although it would have been easy to do. At this point I believed I probably had a workable foot. In Fusion 360, it looked like this:

- Kind of square-ish with sharp edges. Fusion 360 to the rescue. I “Filleted” (rounded) all edges, inside and out, with the exception of the bottom edges, which I “Chamfered” (cut at an angle). Why do the bottom different? Because 3D printers like mine have a problem with steep overhangs, and a fillet starts out with almost a 90° overhang, whereas a chamfer has only a 45° overhang and can be printed by most printers. Because this object is so small, it probably wouldn’t have made any real difference, but it’s a good habit to form when designing objects for 3D printing. I now have this, which looks a lot like the photo at the top of the page:

I think it looks good! Export it, Slice it, Print it. Test the fit…

It looks like a winner to me. It fits snugly, won’t fall off, and will protect the floor. The color? Just happens to be the color of TPU filament I have and a color Julie likes. Which is probably why I have this filament. 🙂
Watch for a future blog on designing a more complex object using a totally different 3D design program.
Good stuff!
Gary Berg 367 Raven View Drive Sagle, ID 83860 Home. 208-265-8152 Cell 509-994-6126 Gary.berg1944@gmail.com
PLEASE NOTE: My IEEE.org account is NOT operational.
>
Simple, you say? Very impressive, Stebbie.
>
Very cool Gary!
Gary, You continue to be on the leading edge of technology! Maybe if we ever have another Headgear Party I can buid something to adorn my head. Hope you’re keeping warm and dry there, not to mention healthy. I look forward to seeing you and Julie sometime in the next year or so. — Cliff
Have a safe and healthy 2021!